The radial clearance corresponds to the relative radial displacement of one ring compared to the other.
The radial clearance is not considered a quality criterion. An improper radial or axial clearance may have detrimental implications during operation within an application. This may include suboptimal noise levels, heat generation, rigidity, and fatigue life. Prior to recommending an internal clearance range, our applications will run an analytical simulation on the bearing and application to ensure optimal performance. For more complex system, our application engineers can complete a FEA analysis, particularly when evaluating multiple bearings within a non-rigid housing.
The normal radial internal clearance CN is the standard clearance range and determined by the size of the bearing. Other standardized clearances are grouped into classes according to the following designations:
- C2 Radial Internal Clearance smaller than CN
- CN (C0) Normal Radial Internal Clearance
- C3 Radial Internal Clearance greater than CN
- C4 Radial Internal Clearance greater than C3
- CX Custom Radial Internal Clearance
In addition, WIB has two defined non-standard radial internal clearance ranges, for which the mean value may be selected during the design phase. They are identified as:
- R (Regular): band width 6 µm.
- L (Large): band width 10 µm.
In the bearing designation, the R or L designations are followed by the mean value of the selected clearance.
Example 1) 623-2Z Y P5R20 – Indicates a radial clearance of 6 µm with values between 17 and 23 µm: (17+23)/2=20.
Example 2) 623-2Z Y P5L20 – Indicates a radial clearance of 10 µm with values between 15 and 25 mm: (15+25)/2=20
Deep groove ball bearings
| RADIAL CLEARANCE | METRIC BEARINGS mm | INCH BEARINGS inch | |||||
| Nominal bore diameter d |
de à |
3 6 |
>6 10 |
>10 18 |
.12 .24 |
>.24 .40 |
>.40 .70 |
| µ m | µ inch | ||||||
| C2 | min max |
0 7 |
0 7 |
0 9 |
0 2.8 |
0 2.8 |
0 3.5 |
|
CN Normal (C0) |
min max |
2 13 |
2 13 |
3 18 |
0.8 5.1 |
0.8 5.1 |
1.2 7.1 |
| C3 | min max |
8 23 |
8 23 |
11 25 |
3.1 9.1 |
3.1 9.1 |
4.3 9.8 |
| C4 | min max |
14 29 |
18 33 |
5.5 11.4 |
7.1 13.0 |
||
Self-aligning ball bearings
| RADIAL CLEARANCE | METRIC BEARINGS mm |
INCH BEARIGNS inch |
||||
| d |
>6 10 |
>10 14 |
>14 18 |
>.24 .40 |
>.40 .55 |
>.55 .70 |
| µ m | µ inch | |||||
| C2 |
2 9 |
2 10 |
3 12 |
0.8 3.5 |
0.8 3.9 |
1.2 4.7 |
|
CN
|
6 17 |
6 19 |
8 21 |
2.4 6.7 |
2.4 7.5 |
3.2 8.3 |
| C3 |
12 25 |
13 16 |
15 28 |
4.7 9.8 |
5.1 10.2 |
5.9 11.0 |
| C4 |
19 33 |
21 35 |
23 37 |
7.5 13.0 |
8.3 13.8 |
9.1 14.6 |
The operational clearance corresponds to the residual radial clearance after assembly and under normal operating conditions. It is determined by the radial clearance before assembly. The effective radial clearance is determined after assembly. The operating radial clearance is determined during operation taking into account thermal expansion.
|
The axial clearance corresponds to the maximum axial displacement of one ring in relation to the other ring. It depends on the radial clearance and on the internal construction of the bearing. The axial clearance may be adjusted by modifying the raceway radius. The use of paired ball bearings allows one to precisely control the axial clearance.
Note that bearings with two rows of balls and oblique contacts have a lower ratio between radial and axial clearance values.
According to the WIB bearing nomeclature, the axial clearance may be specified with the code X followed by the maximum value in µm. Example : 608 Z Y P5X50 indicates a maximum axial clearance of 50 µm.
|

|
|
The angle of contact ß° is determined by the line going through the contact points of the balls in the raceway and a line which is perpendicular to the bearing axis. This is in a position of maximum axial displacement of one ring compared to the other. The angle of contact depends on the radial clearance and the raceway radius and will be slightly increased by applying an axial load.
The greater the angle of contact ß°, the more the bearing will support high axial loads. The construction of the double row bearings with oblique contacts designed with predefined contact angles, makes it possible to withstand high axial loads.
|

|
|
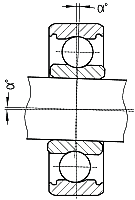
The misalignment angle aº of a bearing is defined by the variation of the angular position of one ring compared to the other. The value of this angle depends on the radial clearance, the raceway radius and the internal construction of the ball bearing. It should be noted that an angle that is too large can increase the noise level.
Double-row deep-groove ball bearings have a lower discharge angle than those with a single row. This angle is all the smaller the greater the spacing between the rows.
|

|